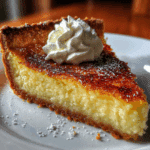
Why Buttermilk Pie Is Your New Favorite Dessert

Buttermilk Pie is a rich, creamy delight that brings the perfect balance of sweetness and tang to your dessert table. This classic Southern treat is surprisingly easy to make, using simple pantry ingredients that come together into a custard-like filling with a tender, flaky crust. If you’re looking for a nostalgic dessert that feels homemade and utterly satisfying, Buttermilk Pie is sure to become your new favorite treat, offering a gorgeous golden hue and melt-in-your-mouth texture every single time.
Why You’ll Love This Recipe
- Simple and Classic: Buttermilk Pie uses just a handful of pantry staples, making it accessible for home bakers of any skill level.
- Perfect Balance of Flavors: The tanginess of buttermilk cuts through the sweetness, creating a beautifully balanced dessert.
- Rich and Creamy Texture: The filling is smooth and custardy, satisfying that craving for comfort food without being heavy.
- Versatile for Any Occasion: Whether it’s a casual family dinner or a holiday gathering, Buttermilk Pie fits right in.
- Quick to Prepare: Thanks to its straightforward steps, you can whip this pie up in under an hour.
Ingredients You’ll Need
Gathering these simple yet essential ingredients will set you up for success. Each component plays a key role in infusing the pie with its signature rich flavor, smooth texture, and inviting golden color.
- Buttermilk: The star ingredient that lends the pie its classic tangy sweetness and creamy consistency.
- Granulated Sugar: Provides just the right amount of sweetness to balance the buttermilk’s tang.
- Eggs: Bind the filling together, giving it structure and that custard-like texture.
- Unsalted Butter: Adds richness and smoothness to the filling for a melt-in-your-mouth feel.
- All-Purpose Flour: Helps thicken the filling slightly, ensuring it sets perfectly without cracking.
- Vanilla Extract: Enhances the flavor by adding depth and a warm, sweet aroma.
- Pie Crust: A tender, flaky pastry shell that holds all the goodness together—store-bought or homemade both work beautifully.
Variations for Buttermilk Pie
Buttermilk Pie is wonderfully adaptable, so don’t hesitate to experiment. Changing up flavors or ingredients based on your preferences or dietary needs keeps this classic fresh and personalized.
- Chocolate Buttermilk Pie: Add a swirl of melted chocolate or cocoa powder for a rich twist on the original.
- Lemon Zest Boost: Incorporate fresh lemon zest to brighten the flavor and add a citrusy dimension.
- Gluten-Free Pie Crust: Swap out your traditional crust for a gluten-free version without sacrificing texture or taste.
- Vegan-Friendly Version: Use plant-based butter, a chia or flax egg substitute, and a dairy-free buttermilk alternative to make this pie vegan.
- Nutty Topping: Sprinkle chopped pecans or walnuts on top before baking for a lovely crunch contrast.

How to Make Buttermilk Pie
Step 1: Prepare Your Pie Crust
Begin by placing a chilled pie crust into your pie dish, gently pressing it into place and trimming any excess edges. For a foolproof start, prick the bottom with a fork to prevent bubbling during baking.
Step 2: Mix the Filling
In a large bowl, whisk together sugar, flour, and eggs until smooth and creamy. Gradually add melted butter and buttermilk, stirring constantly to blend the ingredients into a silky mixture. Finally, stir in vanilla extract for an inviting aroma.
Step 3: Pour and Bake
Carefully pour the filling into the prepared pie shell, smoothing the top with a spatula. Place it in a preheated oven and bake at 350°F (175°C) for about 50 to 60 minutes, or until the edges are set and golden brown, with a slight wobble in the center.
Step 4: Cool Completely
Allow your Buttermilk Pie to cool on a wire rack. Cooling is essential as it lets the filling finish setting, ensuring each slice will hold together beautifully when cut.
Pro Tips for Making Buttermilk Pie
- Use Room Temperature Ingredients: This helps the filling come together smoothly without lumps.
- Don’t Overbake: Slight wobble in the center means it’s perfectly done; overbaking results in a cracked or dry filling.
- Chill Before Serving: Refrigerate the pie for a couple of hours to enhance the flavors and ease slicing.
- Test Your Crust: Blind bake the crust briefly if you prefer a super-crisp base to avoid sogginess.
- Use Fresh Buttermilk: Fresh buttermilk offers the best taste and texture—avoid substitutes if possible for authenticity.
How to Serve Buttermilk Pie
Garnishes
Elevate your Buttermilk Pie by adding fresh whipped cream, a dusting of powdered sugar, or a sprinkle of cinnamon or nutmeg for that extra touch of warmth and visual appeal.
Side Dishes
Pair your pie with a scoop of vanilla or cinnamon ice cream, fresh berries, or a hot cup of coffee or tea to complement the pie’s richness and make the dessert experience even better.
Creative Ways to Present
Serve slices atop delicate dessert plates with a drizzle of caramel or honey for sweetness contrast, or plate mini versions of the pie in ramekins for an elegant individual dessert option.
Make Ahead and Storage
Storing Leftovers
Store your Buttermilk Pie in the refrigerator covered tightly with plastic wrap or foil to keep it fresh for up to 4 days—this prevents drying while preserving flavor and texture.
Freezing
You can freeze Buttermilk Pie successfully by wrapping it snugly in plastic and foil; freeze for up to 2 months. Thaw overnight in the fridge before serving to maintain its perfect custard consistency.
Reheating
If you prefer served slightly warm, reheat slices gently in a low-temperature oven or microwave in short bursts, but serving chilled is often preferred to enjoy the full flavor and texture.
FAQs
What does Buttermilk Pie taste like?
Buttermilk Pie has a sweet, tangy custard flavor that’s smooth and creamy with a delicate balance of richness and lightness from the buttermilk.
Can I use regular milk instead of buttermilk?
Regular milk won’t provide the same tang or texture, but if you don’t have buttermilk, mix 1 tablespoon of vinegar or lemon juice with 1 cup of milk and let it sit for 5 minutes as a substitute.
Is Buttermilk Pie gluten-free?
Traditional Buttermilk Pie uses all-purpose flour, which contains gluten, but you can easily substitute gluten-free flour blends to make it gluten-free without changing the flavor too much.
How long does Buttermilk Pie keep?
Refrigerated, Buttermilk Pie stays delicious for about 3 to 4 days; any longer and it may lose its fresh custard texture.
Can I make Buttermilk Pie ahead of time?
Yes! In fact, Buttermilk Pie tastes even better the next day after chilling, making it an excellent make-ahead dessert choice for gatherings.
Final Thoughts
Whether you’re a seasoned baker or just starting out, Buttermilk Pie offers a wonderful combination of ease, flavor, and warmth that can brighten any dessert table. Its timeless appeal and simplicity are why so many fall in love with this creamy treat. Go ahead and try this delightful classic—you just might find your new favorite dessert!
Related Posts
- Irresistible Strawberry Cupcakes with Buttercream Delight
- How to Make Funfetti Cupcakes Perfectly
- Easy Oreo Cheesecake Bites Recipe to Try
Buttermilk Pie
- Total Time: 1 hour 10 minutes
- Yield: 8 servings 1x
- Diet: Contains gluten (can be made Gluten-Free with substitutions)
Description
Buttermilk Pie is a rich, creamy Southern dessert featuring a perfectly balanced custard-like filling with tangy buttermilk and a tender, flaky crust. Easy to prepare with simple pantry staples, this classic pie offers a melt-in-your-mouth texture and a golden-brown finish, making it a comforting treat ideal for any occasion.
Ingredients
Filling Ingredients
- 1 cup buttermilk
- 1 1/2 cups granulated sugar
- 3 large eggs
- 4 tablespoons unsalted butter, melted
- 2 tablespoons all-purpose flour
- 1 teaspoon vanilla extract
Crust
- 1 9-inch pie crust (store-bought or homemade)
Instructions
- Prepare Your Pie Crust: Begin by placing a chilled pie crust into your pie dish, gently pressing it into place and trimming any excess edges. For a foolproof start, prick the bottom with a fork to prevent bubbling during baking.
- Mix the Filling: In a large bowl, whisk together the sugar, flour, and eggs until smooth and creamy. Gradually add the melted butter and buttermilk, stirring constantly to blend the ingredients into a silky mixture. Finally, stir in the vanilla extract for an inviting aroma.
- Pour and Bake: Carefully pour the filling into the prepared pie shell, smoothing the top with a spatula. Place it in a preheated oven and bake at 350°F (175°C) for about 50 to 60 minutes, or until the edges are set and golden brown with a slight wobble in the center.
- Cool Completely: Allow your Buttermilk Pie to cool on a wire rack. Cooling is essential as it lets the filling finish setting, ensuring each slice will hold together beautifully when cut.
Notes
- Use room temperature ingredients to help the filling come together smoothly without lumps.
- Do not overbake; a slight wobble in the center means the pie is perfectly done.
- Refrigerate the pie for a couple of hours before serving to enhance flavors and ease slicing.
- Blind bake the crust briefly if you prefer a super-crisp base to avoid sogginess.
- Use fresh buttermilk for the best taste and texture; avoid substitutes if possible.
- Prep Time: 15 minutes
- Cook Time: 55 minutes
- Category: Dessert
- Method: Baking
- Cuisine: Southern
Nutrition
- Serving Size: 1 slice (1/8 of pie)
- Calories: 310
- Sugar: 29g
- Sodium: 120mg
- Fat: 15g
- Saturated Fat: 9g
- Unsaturated Fat: 5g
- Trans Fat: 0.2g
- Carbohydrates: 40g
- Fiber: 0.5g
- Protein: 4g
- Cholesterol: 130mg
Keywords: Buttermilk Pie, Southern dessert, custard pie, classic pie, easy pie recipe