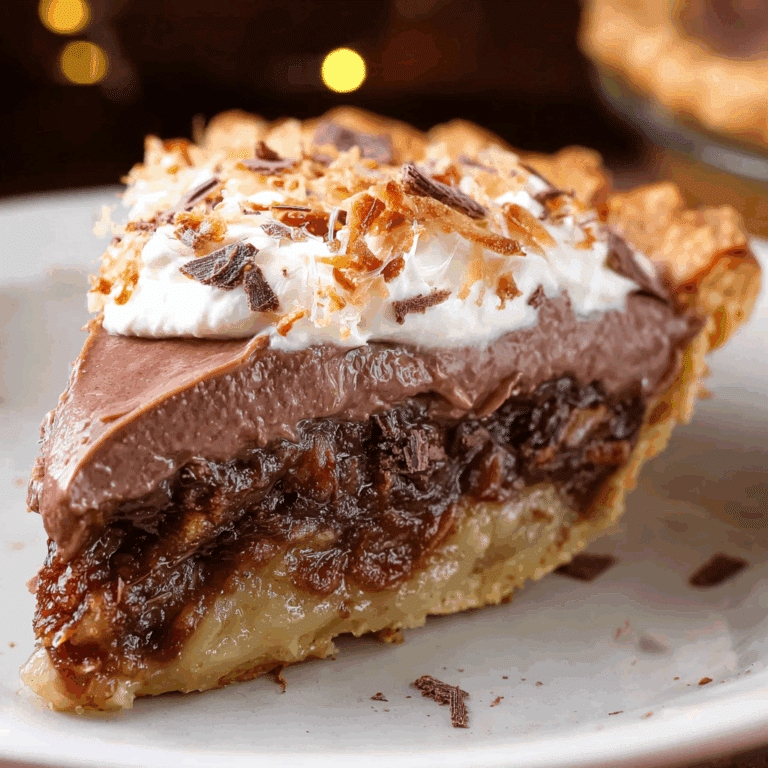
Easy Chocolate Peanut Butter Pie

Indulge in this Easy Chocolate Peanut Butter Pie recipe—rich, creamy, and perfect for any occasion. This dessert effortlessly blends the smoothness of peanut butter with decadent chocolate to create a treat that’s quick to make and irresistibly delicious. Whether you’re hosting friends, satisfying a sweet craving, or celebrating a special moment, this pie will become your go-to favorite in no time.
Why You’ll Love This Recipe
- Simple Ingredients: You’ll be amazed at how a handful of pantry staples come together for a show-stopping dessert.
- Quick Preparation: No complicated steps or long wait times—perfect for last-minute gatherings or spontaneous cravings.
- Rich and Creamy Texture: The silky peanut butter filling pairs perfectly with a smooth chocolate layer for a luxurious bite.
- Versatile Flavor Profile: Loved by both chocolate and peanut butter fans, this pie is a crowd-pleaser for all ages.
- Make-Ahead Friendly: Prepare this pie in advance and refrigerate for a fuss-free dessert option anytime.
Ingredients You’ll Need
Each ingredient in the Easy Chocolate Peanut Butter Pie plays a crucial role, combining to create a balance of flavor, texture, and color that makes this dessert so special. From the crunchy crust to the creamy filling, here’s what you’ll need:
- Graham Cracker Crust: Provides a buttery, crunchy base that perfectly complements the creamy filling.
- Creamy Peanut Butter: Adds a rich, nutty flavor and smooth texture to the pie filling.
- Whipped Cream: Lightens up the filling to keep it fluffy and indulgent without being too heavy.
- Chocolate Chips or Melted Chocolate: Brings deep, intense chocolate flavor and an irresistible finish.
- Powdered Sugar: Sweetens the filling gently without overpowering the peanut butter taste.
- Vanilla Extract: Enhances all the flavors with a subtle hint of warmth and depth.
Variations for Easy Chocolate Peanut Butter Pie
One of the best things about the Easy Chocolate Peanut Butter Pie is how easily it adjusts to your personal taste or dietary needs. Feel free to get creative and make it truly your own:
- Crunchy Element: Add chopped peanuts or crushed pretzels for an extra layer of texture and flavor.
- Nut-Free Version: Substitute peanut butter with sunflower seed butter for a safe, delicious alternative.
- Dark Chocolate Lovers: Use bittersweet or dark chocolate to intensify the chocolate taste.
- Healthier Swap: Use Greek yogurt mixed with peanut butter to reduce fat while keeping creaminess.
- Mini Pies: Prepare individual servings in ramekins for perfectly portioned treats that wow at parties.

How to Make Easy Chocolate Peanut Butter Pie
Step 1: Prepare the Crust
Start by crushing graham crackers into fine crumbs and mixing them with melted butter until the mixture feels sandy but sticks together when pressed. Press it evenly into your pie pan and chill for 10-15 minutes to set.
Step 2: Make the Peanut Butter Filling
In a mixing bowl, combine creamy peanut butter, powdered sugar, and vanilla extract. Gently fold in whipped cream to create a fluffy and smooth filling that holds its shape but remains light.
Step 3: Assemble the Pie
Pour the peanut butter filling into your chilled crust and spread it evenly with a spatula. Make sure there are no air pockets for a uniform texture.
Step 4: Add the Chocolate Layer
Melt chocolate chips gently in a double boiler or microwave, stirring frequently to avoid burning. Drizzle or layer the melted chocolate over the peanut butter filling, then swirl lightly to create an enticing marbled effect.
Step 5: Chill and Set
Place the pie in the refrigerator for at least 3-4 hours, or overnight, allowing the layers to firm up beautifully. This step ensures that every bite is creamy yet solid enough to hold.
Pro Tips for Making Easy Chocolate Peanut Butter Pie
- Use Room Temperature Ingredients: It makes mixing easier and keeps the texture perfectly smooth.
- Don’t Overmix the Whipped Cream: Fold it gently to maintain its airiness for that light, fluffy filling.
- Chill Properly: Adequate refrigeration time is key to achieving the perfect slice and flavor meld.
- Quality Chocolate: Choose high-quality chocolate for a rich and satisfying finish.
- Pre-Chill Serving Plates: Keeps the pie cool longer when serving for the best eating experience.
How to Serve Easy Chocolate Peanut Butter Pie
Garnishes
Top your pie with roasted peanuts, chocolate shavings, or a sprinkle of sea salt to elevate the flavors and add a little crunch. Fresh berries or a dusting of cocoa powder can also bring a colorful touch.
Side Dishes
Pair this luscious pie with a scoop of vanilla ice cream or a dollop of freshly whipped cream to balance the rich flavors beautifully. A cup of coffee or hot chocolate is also a perfect companion to enhance your dessert experience.
Creative Ways to Present
Try serving small slices on dessert plates with streaks of chocolate or peanut butter sauce for a restaurant-quality presentation. Using glass jars or mini trifle bowls also makes for a charming, shareable dessert option.
Make Ahead and Storage
Storing Leftovers
Keep leftover pie covered tightly with plastic wrap or in an airtight container in the refrigerator for up to 4 days to maintain freshness and texture.
Freezing
This pie freezes well—wrap it tightly in plastic wrap and aluminum foil, then store in the freezer for up to 2 months. Thaw in the refrigerator overnight before serving to preserve its creamy consistency.
Reheating
Since this is a no-bake pie, reheating isn’t necessary. If you like a softer texture, let slices sit at room temperature for 10 to 15 minutes before enjoying.
FAQs
Can I use crunchy peanut butter instead of creamy?
Absolutely! Crunchy peanut butter adds an extra texture dimension, giving your pie delightful bits throughout the creamy filling.
Is this pie gluten-free?
To make it gluten-free, simply use a gluten-free cookie or cracker crust instead of graham crackers, and double-check the other ingredient labels.
Can I make this pie vegan?
Yes, by swapping traditional whipped cream with coconut whipped cream, using vegan chocolate, and ensuring peanut butter and crust ingredients are vegan-friendly, you can enjoy a vegan version.
How long does the Easy Chocolate Peanut Butter Pie last?
When refrigerated properly, it stays fresh and delicious for about 3 to 4 days, making it a great option for preparing ahead of time.
Can I double the recipe?
You can easily double or even triple the ingredients to make a larger pie or multiple pies, just be sure to adjust your baking pans accordingly.
Final Thoughts
If you’re looking for a dessert that combines ease, flavor, and a wow factor, the Easy Chocolate Peanut Butter Pie is an absolute must-try. This recipe’s simplicity and crowd-pleasing taste make it a staple you’ll come back to again and again. Treat yourself and your loved ones to this luscious, creamy delight—you won’t regret it!
Related Posts
Print
Easy Chocolate Peanut Butter Pie
- Total Time: 4 hours 15 minutes (including chilling time)
- Yield: 8 servings 1x
- Diet: Gluten Free (with gluten-free crust substitution)
Description
Indulge in a rich and creamy Easy Chocolate Peanut Butter Pie that combines the smoothness of peanut butter with decadent chocolate for a quick, no-bake dessert perfect for any occasion. With simple ingredients and effortless preparation, this pie is a crowd-pleaser suitable for make-ahead meals and customizable to dietary preferences.
Ingredients
Graham Cracker Crust
- 1 1/2 cups graham cracker crumbs
- 6 tablespoons melted butter
Peanut Butter Filling
- 1 cup creamy peanut butter
- 1 cup powdered sugar
- 1 teaspoon vanilla extract
- 1 cup whipped cream
Chocolate Layer
- 1 cup chocolate chips or melted chocolate
Instructions
- Prepare the Crust: Crush graham crackers into fine crumbs and mix them with melted butter until the mixture feels sandy but sticks together when pressed. Press mixture evenly into a pie pan and chill for 10-15 minutes to set.
- Make the Peanut Butter Filling: In a mixing bowl, combine creamy peanut butter, powdered sugar, and vanilla extract. Gently fold in whipped cream to create a fluffy and smooth filling that holds its shape but remains light.
- Assemble the Pie: Pour the peanut butter filling into your chilled crust and spread it evenly with a spatula ensuring there are no air pockets for a uniform texture.
- Add the Chocolate Layer: Melt chocolate chips gently in a double boiler or microwave, stirring frequently to avoid burning. Drizzle or layer the melted chocolate over the peanut butter filling, then swirl lightly to create an enticing marbled effect.
- Chill and Set: Place the pie in the refrigerator for at least 3-4 hours, or overnight, allowing the layers to firm up beautifully for a creamy yet solid texture.
Notes
- Use room temperature ingredients for easier mixing and smoother texture.
- Fold whipped cream gently to maintain airiness and lightness of filling.
- Adequate refrigeration time is essential for perfect slices and flavor melding.
- Choose high-quality chocolate for a rich and satisfying finish.
- Pre-chill serving plates to keep pie cool longer when serving.
- Prep Time: 15 minutes
- Cook Time: 0 minutes
- Category: Dessert
- Method: No-Bake
- Cuisine: American
Nutrition
- Serving Size: 1 slice (1/8 of pie)
- Calories: 350 kcal
- Sugar: 25 g
- Sodium: 150 mg
- Fat: 25 g
- Saturated Fat: 8 g
- Unsaturated Fat: 14 g
- Trans Fat: 0 g
- Carbohydrates: 28 g
- Fiber: 2 g
- Protein: 7 g
- Cholesterol: 20 mg
Keywords: chocolate peanut butter pie, no-bake pie, easy dessert, creamy pie, peanut butter dessert, chocolate dessert, make-ahead pie