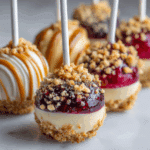
Irresistible No-Bake Cheesecake Pops Recipe

Craving something creamy, sweet, and effortlessly delightful? These No-Bake Cheesecake Pops are exactly the treat you need! Combining the lusciousness of classic cheesecake with the fun and convenience of a pop, this recipe is both simple and crowd-pleasing. Perfect for any occasion, these bite-sized delights come together quickly without the oven, offering a smooth, dreamy texture and endless flavor possibilities. Whether you’re hosting a party or just want a quick indulgence, these No-Bake Cheesecake Pops will steal the spotlight.
Why You’ll Love This Recipe
- Easy preparation: No baking required means you can whip these up in no time.
- Deliciously creamy texture: Smooth and velvety, perfect for cheesecake lovers.
- Customizable flavors: From classic vanilla to chocolate or fruity twists, the options are endless.
- Perfect for any occasion: Birthday parties, holiday gatherings, or an everyday treat made special.
- Kid-friendly and fun: Pops on a stick make dessert both playful and mess-free for everyone.
Ingredients You’ll Need
These ingredients are simple and common, but each plays a crucial role in crafting the perfect No-Bake Cheesecake Pops. From the creamy base to the crunch of toppings, every element adds flavor, texture, or color to make these treats truly irresistible.
- Cream cheese: The rich and tangy foundation that gives cheesecake its signature flavor and creamy consistency.
- Powdered sugar: Adds the perfect sweetness while blending smoothly with the cream cheese.
- Whipped cream: Lightens the mixture and creates that dreamy, fluffy texture.
- Vanilla extract: A splash of vanilla enhances flavor depth and aroma.
- Graham cracker crumbs: Essential for the classic crust taste and a bit of crunch.
- Chocolate or candy melts: For coating and decorating the pops, adding color and a delightful snap.
- Popsicle sticks: The fun factor that transforms cheesecake bites into playful pops.
- Optional toppings: Sprinkles, crushed nuts, or fresh fruit for added texture and visual appeal.
Variations for No-Bake Cheesecake Pops
Feel free to experiment and personalize your No-Bake Cheesecake Pops. This recipe is extremely forgiving and easy to adapt based on whatever you have on hand or your dietary needs.
- Fruit-flavored pops: Mix in pureed strawberries, blueberries, or mango to infuse fresh, natural fruit flavor.
- Chocolate delight: Add cocoa powder to the cheesecake mixture for a rich chocolate treat.
- Nutty twist: Fold in chopped pecans, almonds, or hazelnuts for added crunch and flavor.
- Gluten-free option: Swap graham cracker crumbs for gluten-free cookie crumbs or crushed nuts.
- Vegan version: Use dairy-free cream cheese and whipped coconut cream for a plant-based alternative.

How to Make No-Bake Cheesecake Pops
Step 1: Prepare the Cheesecake Mixture
Start by beating the cream cheese until smooth, then gradually add powdered sugar and vanilla extract. Gently fold in whipped cream to lighten the mixture and create that luscious cheesecake texture.
Step 2: Shape the Pops
Scoop the cheesecake mixture into small balls using a cookie scoop or your hands. Place these balls on a parchment-lined tray and freeze for about 30 minutes to firm up before coating.
Step 3: Insert the Sticks
Once the cheesecake balls are firm, carefully insert popsicle sticks into each one. This step makes dipping easier and gives you the classic pop look.
Step 4: Coat the Pops
Melt your chocolate or candy melts according to package instructions. Dip each cheesecake ball into the coating, making sure to fully cover it, and allow any excess to drip off.
Step 5: Add Toppings and Set
While the coating is still wet, sprinkle your choice of toppings like crushed nuts, sprinkles, or mini chocolate chips. Place the pops back on the lined tray and chill until the coating hardens.
Pro Tips for Making No-Bake Cheesecake Pops
- Chill thoroughly: Freezing the cheesecake balls before coating helps the chocolate set smoothly without melting the pops.
- Use room temperature ingredients: This ensures a smooth and lump-free cheesecake mixture.
- Work quickly when dipping: Chocolate hardens fast, so have all your toppings ready before dipping.
- Double dip for thicker coating: For an extra chocolatey shell, dip twice, allowing the first layer to set in the fridge.
- Store on parchment paper: Prevent sticking by laying pops flat on a lined tray during chilling.
How to Serve No-Bake Cheesecake Pops
Garnishes
Garnish your pops with colorful sprinkles, shredded coconut, crushed nuts, or edible glitter for a festive touch that matches any party theme or season.
Side Dishes
Serve alongside fresh berries, a drizzle of raspberry sauce, or a cup of rich espresso to balance the creamy sweetness with fresh or bitter complements.
Creative Ways to Present
Present No-Bake Cheesecake Pops standing upright in a decorated foam block or nestled in a bed of shredded paper or edible flowers for an eye-catching dessert display.
Make Ahead and Storage
Storing Leftovers
Keep any extra pops in an airtight container in the refrigerator for up to 3 days to maintain freshness and prevent drying out.
Freezing
No-Bake Cheesecake Pops freeze beautifully; just place them in a single layer on a tray until firm, then transfer to a freezer bag for up to one month.
Reheating
For best texture, thaw frozen pops in the fridge for a few hours before serving; avoid microwaving to prevent melting the coating.
FAQs
Can I make these pops without a popsicle stick?
Absolutely! You can serve the cheesecake balls in mini cupcake liners or as bite-sized treats on a platter if you prefer not to use sticks.
Is this recipe suitable for kids?
Yes, No-Bake Cheesecake Pops are perfect for kids to help make and eat, especially because there’s no oven involved, making it safer and easier.
What can I use instead of graham cracker crumbs?
You can substitute crushed digestive biscuits, pretzels, or gluten-free cookies if you want a different flavor or need a gluten-free option.
How long will these pops hold up for a party?
Keep them chilled in the refrigerator, and they should stay fresh and delicious for up to 4 hours during your event.
Can I add alcohol for adult versions?
Yes! Adding a splash of liqueur like Baileys or amaretto into the cheesecake mixture can create a fun adult twist on the pops.
Final Thoughts
If you’re searching for a dessert that’s easy to make, delightfully creamy, and impressively versatile, these No-Bake Cheesecake Pops are your answer. Fun to prepare, customizable to your taste, and guaranteed to win hearts, they are a delicious treat you’ll want to make again and again. So grab your ingredients, get creative, and enjoy every luscious bite!
Related Posts
- Irresistible Strawberry Cupcakes with Buttercream Delight
- How to Make Funfetti Cupcakes Perfectly
- Easy Oreo Cheesecake Bites Recipe to Try
No-Bake Cheesecake Pops
- Total Time: 45 minutes (including freezing time)
- Yield: 20 pops 1x
- Diet: Gluten Free
Description
No-Bake Cheesecake Pops are creamy, sweet, and easy-to-make treats that combine the lusciousness of classic cheesecake with the fun of pops on a stick. Perfect for any occasion, these bite-sized delights have a smooth texture and customizable flavors without requiring any baking.
Ingredients
Cheesecake Base
- 8 oz cream cheese, softened
- 1 cup powdered sugar
- 1 tsp vanilla extract
- 1/2 cup whipped cream
Crust and Coating
- 1 cup graham cracker crumbs
- 8 oz chocolate or candy melts (for coating)
- Popsicle sticks
Optional Toppings
- Sprinkles
- Crushed nuts (pecans, almonds, or hazelnuts)
- Mini chocolate chips
- Fresh fruit
Instructions
- Prepare the Cheesecake Mixture: Beat the cream cheese until smooth. Gradually add powdered sugar and vanilla extract, mixing well. Gently fold in whipped cream to lighten the mixture and create a fluffy cheesecake texture.
- Shape the Pops: Scoop the cheesecake mixture into small balls using a cookie scoop or your hands. Place the balls on a parchment-lined tray and freeze for about 30 minutes until firm.
- Insert the Sticks: Carefully insert popsicle sticks into each firm cheesecake ball to assist with dipping and create the classic pop appearance.
- Coat the Pops: Melt chocolate or candy melts according to package instructions. Dip each cheesecake ball into the melted coating fully, allowing excess to drip off.
- Add Toppings and Set: While the coating is still wet, sprinkle your chosen toppings such as crushed nuts, sprinkles, or mini chocolate chips. Place the pops back on the parchment-lined tray and chill until coating hardens.
Notes
- Freeze the cheesecake balls thoroughly before coating to prevent melting.
- Use room temperature cream cheese for a smooth, lump-free mixture.
- Work quickly when dipping as chocolate hardens fast.
- For a thicker coating, dip the pops twice, allowing the first layer to set.
- Store pops on parchment paper to prevent sticking.
- These pops are suitable for kids as there is no baking involved.
- Can be made gluten-free by swapping graham crackers with gluten-free cookie crumbs or nuts.
- For a vegan version, use dairy-free cream cheese and whipped coconut cream.
- Optional: Add a splash of liqueur like Baileys or amaretto for an adult twist.
- Prep Time: 15 minutes
- Cook Time: 0 minutes
- Category: Appetizers
- Method: No-Bake
- Cuisine: American
Nutrition
- Serving Size: 1 pop
- Calories: 150
- Sugar: 12g
- Sodium: 90mg
- Fat: 10g
- Saturated Fat: 6g
- Unsaturated Fat: 3g
- Trans Fat: 0g
- Carbohydrates: 12g
- Fiber: 0.5g
- Protein: 2g
- Cholesterol: 30mg
Keywords: No-Bake Cheesecake Pops, Cheesecake Pops, Easy Dessert, No Oven Dessert, Kid friendly dessert, Gluten Free dessert