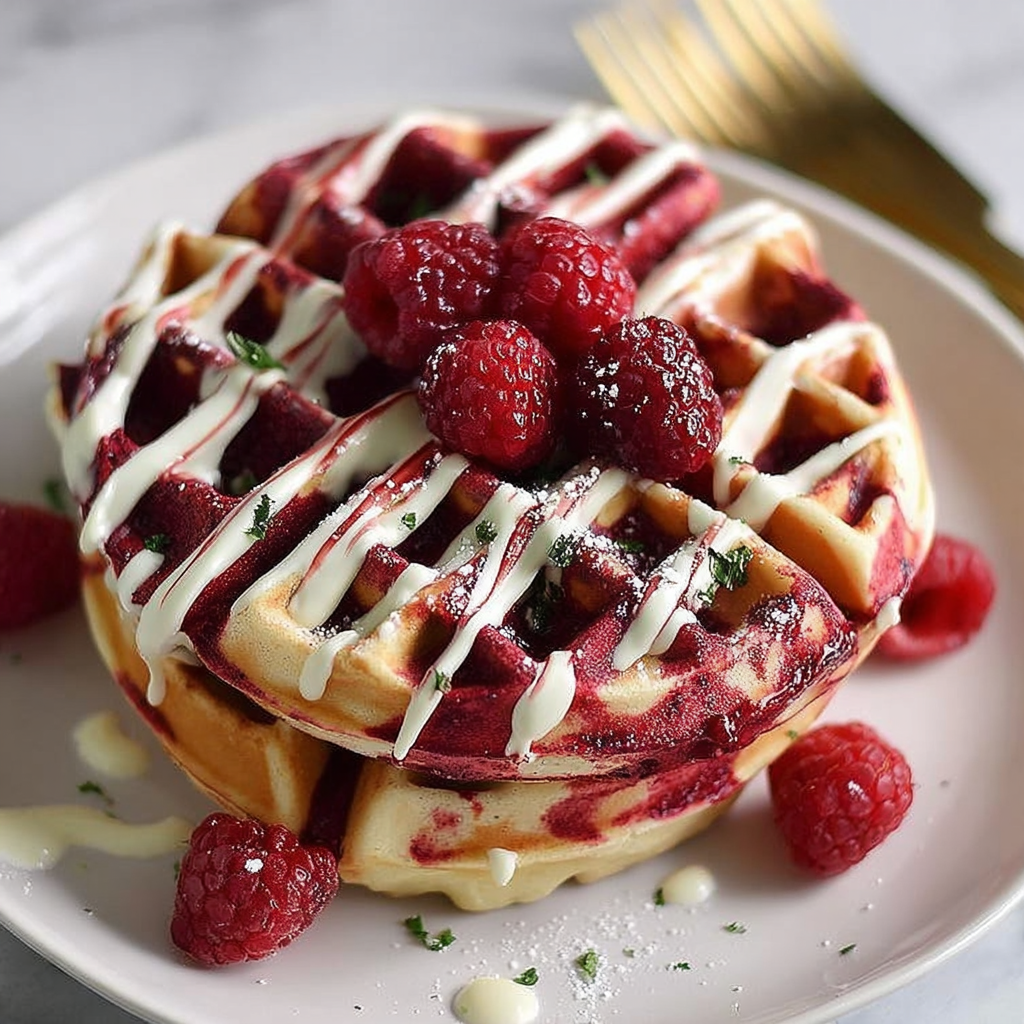
Red Velvet Marble Waffles

If you’re looking to wow your breakfast crowd with a show-stopping yet simple dish, look no further than these Red Velvet Marble Waffles. This recipe combines the rich, velvety goodness of classic red velvet cake with the light, airy texture of waffles, all beautifully swirled to create a stunning marble effect. Whether you’re serving weekend brunch guests or just treating yourself, these Red Velvet Marble Waffles bring a perfect blend of indulgence and fun that everyone will adore.
Why You’ll Love This Recipe
- Bold, Beautiful Flavor: The classic cocoa and tangy cream cheese flavors shine through while keeping the waffle light and fluffy.
- Fun and Eye-Catching: The marble swirl technique makes each waffle look like an edible work of art that’s perfect to share on social media.
- Quick and Easy to Make: With pantry staples and a straightforward process, breakfast doesn’t have to be complicated.
- Versatile for Any Occasion: Serve them up for birthdays, Valentine’s Day, or a cozy weekend treat — these waffles always impress.
- Family-Friendly Appeal: Kids love the vibrant red color and fun texture, making it a guaranteed breakfast winner.
Ingredients You’ll Need
Each ingredient in this recipe plays a vital role in creating the perfect Red Velvet Marble Waffles. From the cocoa powder that adds depth to the buttermilk that keeps everything tender, these simple elements come together beautifully without fuss.
- All-purpose flour: Provides the base structure needed for fluffy waffles with a balanced crumb.
- Cocoa powder: Adds that unmistakable rich chocolate flavor intrinsic to red velvet creations.
- Baking powder and baking soda: These leavening agents help the waffles rise and maintain a light texture.
- Buttermilk: Gives a tender crumb with a slight tang, enhancing the red velvet flavor.
- Granulated sugar: Sweetens without overpowering, balancing the cocoa’s bitterness.
- Eggs: Bind the ingredients and contribute to the waffle’s golden exterior.
- Vegetable oil or melted butter: Keeps the waffles moist and adds richness without weighing them down.
- Vanilla extract: Boosts overall flavor with its warm, aromatic notes.
- Red food coloring: The secret to that iconic, vibrant hue that sets red velvet apart.
- Optional cream cheese glaze or syrup: Perfect to drizzle on top for extra decadence.
Variations for Red Velvet Marble Waffles
One of the best things about Red Velvet Marble Waffles is how easy they are to customize. Feel free to play around with flavors, dietary adjustments, or toppings to make this recipe uniquely yours.
- Gluten-free version: Use a gluten-free flour blend for those avoiding gluten while keeping texture light.
- Vegan adaptation: Swap eggs for flax eggs and use plant-based milk and oil to meet vegan preferences.
- Chocolate chips swirl: Stir in mini chocolate chips for extra bursts of chocolate in every bite.
- Berry mix-in: Gently fold in fresh raspberries or strawberries for a fruity twist.
- Spiced variation: Add a pinch of cinnamon and nutmeg to the batter for warm, cozy flavors.
How to Make Red Velvet Marble Waffles
Step 1: Prepare the batter
In a large bowl, whisk together all-purpose flour, cocoa powder, baking powder, baking soda, and sugar until evenly combined. In a separate bowl, mix the buttermilk, eggs, vegetable oil, vanilla extract, and red food coloring until smooth. Slowly add the wet ingredients to the dry, stirring just until combined to avoid overmixing and keep the batter light.
Step 2: Create the marble effect
Divide the batter roughly in half. Set one half aside as your plain red velvet batter. To the other half, add an extra teaspoon of cocoa powder and mix gently for a deeper chocolate tone. In your waffle iron, pour alternating spoonfuls of each batter side by side. Use a knife or skewer to gently swirl them together, creating the distinct marble pattern.
Step 3: Cook the waffles
Preheat your waffle iron according to the manufacturer’s instructions and lightly grease it if necessary. Pour the swirled batter onto the iron, close the lid, and cook for 3-5 minutes or until the waffles are crisp on the outside and a toothpick inserted in the center comes out clean. Adjust cooking time according to your waffle maker.
Step 4: Serve and enjoy
Carefully remove the waffles from the iron and plate them immediately. Add your favorite toppings such as powdered sugar, cream cheese glaze, fresh fruit, or maple syrup while the waffles are still warm.
Pro Tips for Making Red Velvet Marble Waffles
- Preheat the waffle iron well: Ensures a crispy exterior and fluffy inside every time.
- Don’t overmix the batter: Overmixing can make waffles tough, so stir just until ingredients are blended.
- Use buttermilk or a substitute: It reacts with baking soda to give waffles a tender crumb and subtle tang.
- Create thin swirls: When marbling the batter, thin swirls give a more beautiful, distinctive pattern.
- Serve immediately or keep warm: To maintain crispness, keep waffles in a warm oven on a wire rack until ready to serve.
How to Serve Red Velvet Marble Waffles
Garnishes
Fresh berries, a dusting of powdered sugar, a drizzle of cream cheese glaze, or whipped cream are perfect to enhance both appearance and flavor without overpowering the delicate red velvet essence.
Side Dishes
Pair your Red Velvet Marble Waffles with light sides like scrambled eggs, crispy bacon or even a fresh fruit salad to balance rich flavors and create a complete meal everyone will love.
Creative Ways to Present
Stack multiple waffles layered with cream cheese frosting or mascarpone cheese and fresh fruit for a stunning breakfast cake. Alternatively, cut into bite-sized pieces and serve as waffle bites with dipping sauces for a fun brunch appetizer.
Make Ahead and Storage
Storing Leftovers
Place leftover waffles in an airtight container and store in the fridge for up to 2 days. To help retain crispness, separate layers with parchment paper.
Freezing
Freeze waffles individually on a baking sheet before transferring them to a freezer-safe bag or container. They will keep well for up to 3 months, making them convenient for future quick breakfasts.
Reheating
Reheat waffles in a toaster, toaster oven, or oven at 350°F (175°C) for 5-7 minutes until warmed through and crisp again—skip the microwave to avoid sogginess.
FAQs
Can I make Red Velvet Marble Waffles without food coloring?
Yes, but the signature red hue won’t be as vibrant. Natural alternatives like beet juice can add some color, but food coloring remains the easiest and most effective way to achieve the classic appearance.
What’s the best waffle iron to use?
Any standard waffle iron works well. For best results, use one that makes thicker Belgian-style waffles to showcase the marble pattern beautifully.
Can I prepare the batter the night before?
You can mix the dry and wet ingredients separately the night before, then combine them just before cooking. This prevents overmixing and keeps the waffles fluffy.
Is there a good dairy-free substitute for buttermilk?
Yes, combine 1 cup of plant-based milk with 1 tablespoon of lemon juice or apple cider vinegar and let it sit for 5 minutes before using as a buttermilk substitute.
How do I prevent the chocolate and red parts from blending into a single color?
Make sure to gently swirl the batters and avoid overmixing the layers once combined in the iron. Use a light hand with the swirling tool for a distinct marble effect.
Final Thoughts
Red Velvet Marble Waffles are a delightful way to elevate your breakfast routine with a dish that looks impressive but is surprisingly easy to make. Perfect for any day you want a little extra joy in your morning, this recipe combines stunning visuals with mouthwatering flavor. So go ahead—whip up a batch, share with loved ones, and savor every irresistible bite!
Related Posts
- Crispy German Potato Pancakes Recipe
- Bourbon Maple Bacon French Toast
- Blueberry Cottage Cheese Breakfast Bake

Red Velvet Marble Waffles
- Total Time: 20-25 minutes
- Yield: 6-8 waffles 1x
- Diet: Vegetarian
Description
Red Velvet Marble Waffles blend the rich flavors of classic red velvet cake with light, fluffy waffles featuring a beautiful marble swirl. Perfect for an indulgent breakfast or brunch, these waffles are quick and easy to make, visually stunning, and loved by all ages.
Ingredients
Dry Ingredients
- 1 ½ cups all-purpose flour
- 2 tablespoons cocoa powder
- 1 teaspoon baking powder
- ½ teaspoon baking soda
- ¼ cup granulated sugar
Wet Ingredients
- 1 cup buttermilk
- 2 large eggs
- ¼ cup vegetable oil or melted butter
- 1 teaspoon vanilla extract
- 1 tablespoon red food coloring
Additional for Marble Effect
- 1 teaspoon cocoa powder (extra for deep chocolate batter)
Optional Toppings
- Cream cheese glaze or syrup
- Powdered sugar
- Fresh berries
- Maple syrup
Instructions
- Prepare the batter: In a large bowl, whisk together the flour, cocoa powder, baking powder, baking soda, and sugar until evenly combined. In a separate bowl, mix the buttermilk, eggs, vegetable oil, vanilla extract, and red food coloring until smooth. Slowly combine the wet ingredients into the dry, stirring just until mixed to avoid overmixing and keep the batter light.
- Create the marble effect: Divide the batter roughly in half. Set one half aside as the plain red velvet batter. Add an extra teaspoon of cocoa powder to the other half and mix gently for a deeper chocolate tone. In a preheated waffle iron, pour alternating spoonfuls of each batter side by side. Use a knife or skewer to gently swirl them together, creating a marble pattern.
- Cook the waffles: Lightly grease the waffle iron if needed. Pour the swirled batter onto the iron, close the lid, and cook for 3-5 minutes or until waffles are crisp outside and a toothpick inserted comes out clean. Adjust timing based on waffle maker performance.
- Serve and enjoy: Carefully remove waffles and plate immediately. Add preferred toppings such as powdered sugar, cream cheese glaze, fresh fruit, or maple syrup while warm.
Notes
- Preheat the waffle iron well to achieve a crispy exterior and fluffy inside.
- Do not overmix the batter; stir only until ingredients are combined to keep waffles light and tender.
- Use buttermilk or a suitable dairy-free substitute for a tender crumb and subtle tang.
- Create thin swirls when marbling for a more beautiful and distinct pattern.
- Serve waffles immediately or keep warm on a wire rack in a low oven to maintain crispness.
- Prep Time: 10 minutes
- Cook Time: 3-5 minutes per waffle batch
- Category: Breakfast
- Method: Grilling
- Cuisine: American
Nutrition
- Serving Size: 1 waffle
- Calories: 220 kcal
- Sugar: 8 g
- Sodium: 160 mg
- Fat: 10 g
- Saturated Fat: 2.5 g
- Unsaturated Fat: 6 g
- Trans Fat: 0 g
- Carbohydrates: 28 g
- Fiber: 1 g
- Protein: 5 g
- Cholesterol: 55 mg
Keywords: red velvet waffles, marble waffles, breakfast waffles, brunch recipe, chocolate waffles, red velvet dessert